Introduction
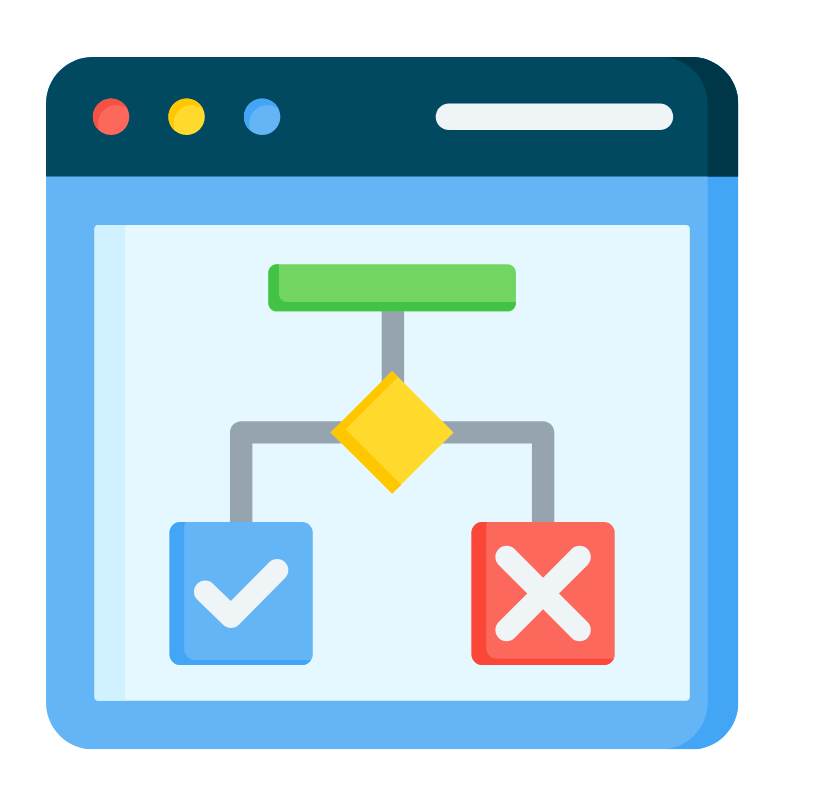
Filling out forms can be tedious, especially when you’re stuck dealing with unnecessary fields that don’t apply to every signer’s situation. Now, imagine if your forms could think for themselves, showing or hiding fields based on the responses provided. This is actually the function of the Docusign conditional logic fields.
For those filling out the forms, Docusign conditional logic makes the process faster and easier. They’ll only see questions that are relevant to their specific situation, so they won’t waste time answering fields that don’t apply to them. For instance, if a signer selects “yes” to a question, the following question becomes mandatory. Conversely, if “no” is selected, the next question disappears.
So how does this work? And how can you implement this powerful feature in your Docusign? We will cover it step-by-step in this tutorial.

Key Takeaways
- Docusign Conditional Logic enables you to create dynamic forms that show or hide fields based on the signer’s responses.
- It simplifies the form-filling process by ensuring recipients only see questions relevant to them, which improves efficiency and accuracy.
- Conditional logic can make certain fields mandatory based on previous answers to automate data collection and minimizing errors.
- Docusign workflow creators can set up simple or complex conditional rules using formula fields for more intricate conditions.
What is Docusign Conditional Logic?
Docusign conditional logic is a feature that helps you control which fields appear in your forms based on how signers respond. Think of it like a smart conversation: the form “listens” to the answers and shows only the questions that matter. This not only makes the process smoother for your signers but also ensures you collect accurate, relevant information. In a nutshell, it allows you to:
- Show or Hide Fields: Make certain fields appear or disappear depending on what your signer selects.
- Make Fields Mandatory: For example, if a signer chooses “Yes” to a question, the next field becomes required. If they choose “No,” that field can disappear.
- Simplify Form-Filling: Signers can focus only on the questions that matter to them.
- Collect Accurate Information: Ensure the signer provides the information you really need to minimize follow-up communication.
Setting up these conditions in Docusign is quick and easy, in fact, with just a few clicks, you’re good to go. If you’re not quite sure how Docusign works yet, no worries! Just check out our beginner’s guide to get started.
How Docusign Conditional Logic Works: With Examples
Without Docusign Conditional Logic Fields, collecting accurate information from recipients on complex forms can be a nightmare. You’d have to follow up in case they missed a field for every signer. This eats up your valuable time and creates a poor user experience for your signers
But with Docusign Conditional Logic Fields, your forms become smart. They automatically adjust based on the signer’s responses, thus, no more duplicate work, no more confusion.
Here are example scenarios on how conditional logic works:
Example 1:Imagine you’re filling out a form that asks, “Do you own a property?”
- If you select “Yes,” additional fields like “Property Address,” “Type of Property,” and “Year Purchased” will automatically appear.
- If you select “No,” those extra fields will stay hidden, keeping the form clean and simple.
Example 2:Let’s say a form asks, “Do you have any dependents?”
- Choosing “Yes” will trigger new fields asking for the names and ages of your dependents.
- If you choose “No,” the form skips ahead, avoiding unnecessary questions.
Hence, Docusign Conditional Logic allows you to create smart, dynamic forms that adjust in real-time based on your signer’s inputs. In a nutshell, here’s what it does:
Whether you need to make certain fields mandatory based on answers or hide irrelevant ones to speed up the process, conditional logic in Docusign makes it effortless.
Benefits of Using Conditional Logic
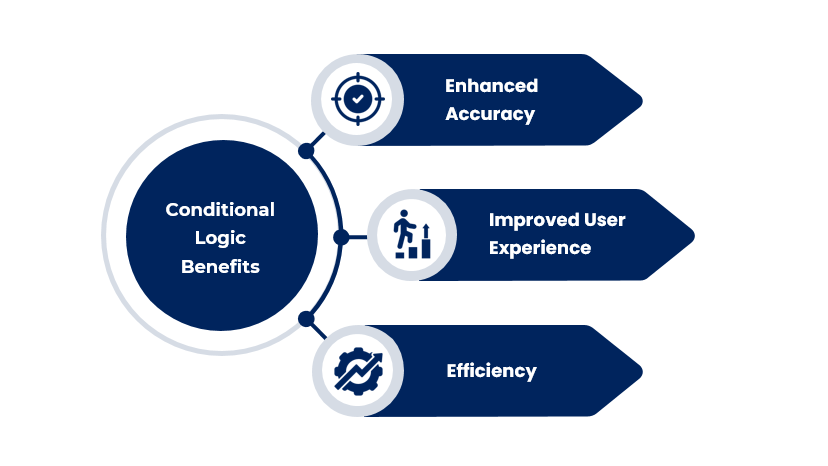
- Enhanced Accuracy: Only relevant fields are presented to the signer.
- Improved User Experience: Simplifies the form-filling process.
- Efficiency: Saves time by eliminating unnecessary fields.
Set Up Conditional Logic in Docusign
Before we get into the steps, it’s important to understand what a trigger field is. Think of a trigger field as a switch that controls the visibility of other fields in your form. Depending on what the signer selects, certain fields will either appear or become hidden.
For example, imagine you’re filling out a form and come across the question: “Are you a private investment company?”
- If you select Yes, more questions will appear asking for additional details.
- If you select No, no further questions show up, and you can move on.
By default, all fields in Docusign are visible. To change this, you’ll need to set up rules so that specific fields only appear when a certain option is selected in another field. Here’s how to do it:
Step 1: Add Trigger Fields
First, add the trigger field to your document. This field will control whether other fields appear or remain hidden.
- For Yes/No questions, use radio buttons.
- If multiple selections are allowed, use checkboxes.
Step 2: Rename the Trigger Field Label
Next, give your trigger field a clear, descriptive label. This will help you easily identify it when setting up conditional rules.
Example:
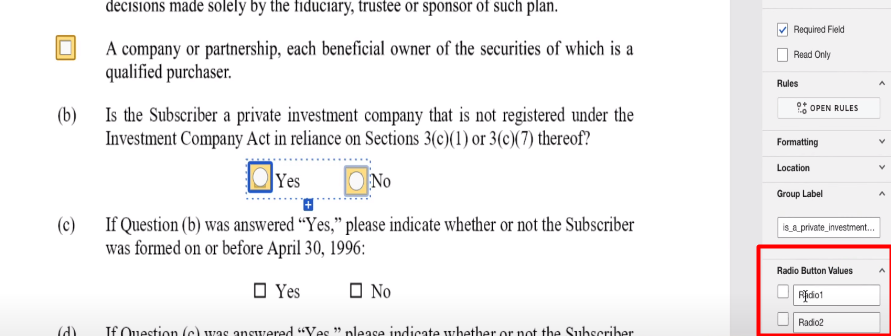
Let’s say your form includes this question:
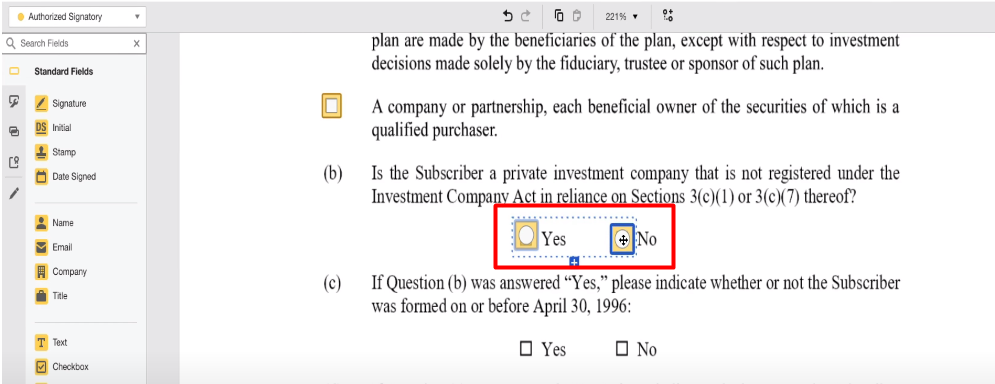
“Is the subscriber a private investment company that is not registered under the Investment Company Act in reliance on Sections 3(c)(1) or 3(c)(7) thereof?”
The options are Yes and No. You want the following questions to appear only if the answer is Yes.
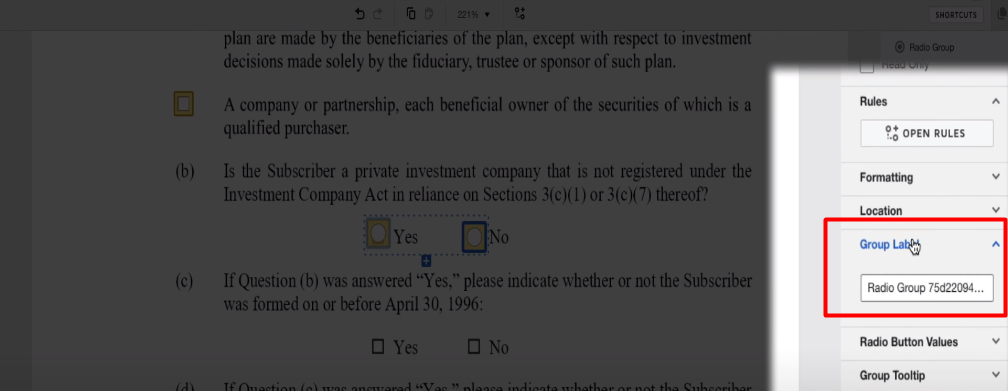
Note: Go to group label and choose a label that clearly describes the purpose of the trigger field.
Step 3: Set Radio Button Values
After naming the trigger field, rename the values of each radio button:
- Radio 1 > rename it to ‘Yes’
- Radio 2 > rename it to ‘No’
Setting these values makes it easier to create rules for field visibility later.
Important: This applies specifically to radio buttons and checkboxes.
Step 4: Add and Configure Conditional Fields
Now that you’ve set up your trigger field, it’s time to add the fields that will appear or disappear based on the trigger’s selection.
First, click on the radio button group (trigger field) you set up earlier. In our example, this would be the Yes radio button for the question: “Is the subscriber a private investment company?”

Once you’ve selected the trigger field, navigate to the “Conditional Fields” tab in Docusign and click “Create Rule”.
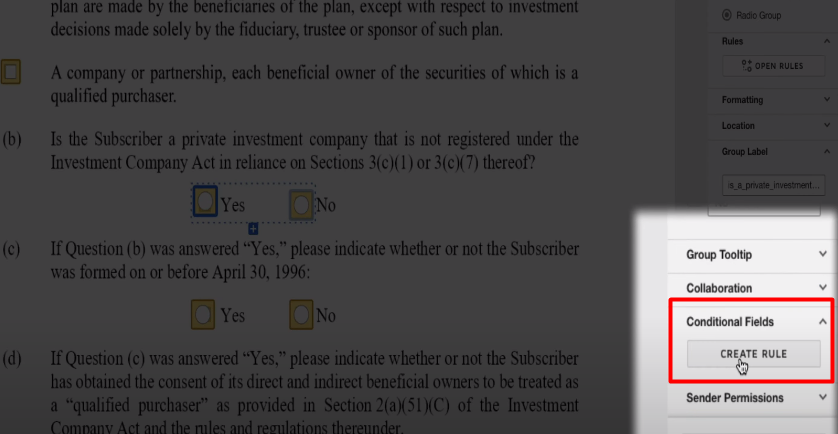
Now you need to tell Docusign which radio button option will trigger the visibility of your action fields. In this case, you’ll select ‘Yes’ because that’s the trigger that should reveal additional fields.


After selecting Yes, choose the fields you want to appear when this option is selected. These are your conditional fields (the ones that depend on the trigger).
Make sure all your fields, especially your triggers, have clear labels. This will help you easily identify which fields to link in your conditional rules. Without proper labels, it can get confusing to match the correct fields.
Step 5: Finalize the Rule
- Once you’ve linked the trigger and action fields, Docusign will confirm that the rule was successfully added.
- Click Done to save your rule.
Step 6: Test Your Conditional Logic
- To make sure everything is working correctly, click on Preview.
- If you select Yes, the next set of questions will appear as required fields.
- If you select No, those additional questions will stay hidden.
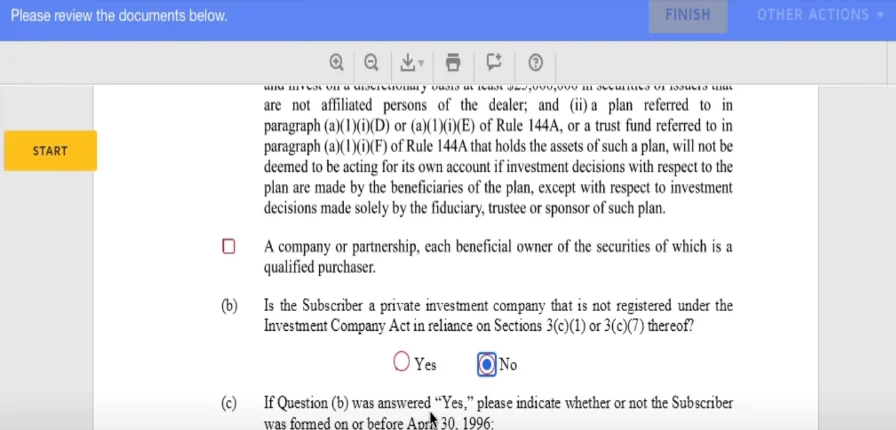
That’s it! You’ve now successfully set up conditional fields in Docusign. This ensures your forms are dynamic and only show relevant questions to the signer based on their selections.
Setting Up Complex Conditional Logic in Docusign
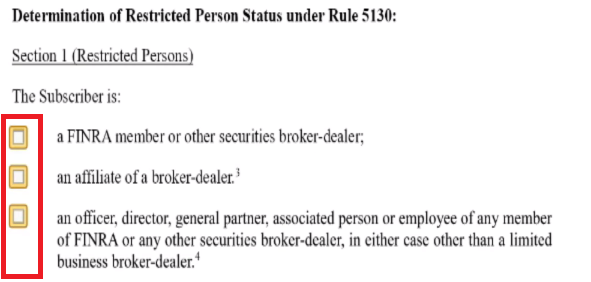
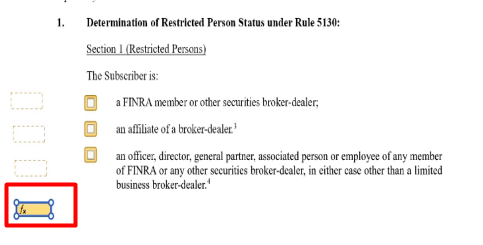
What if you want a text box to be visible and required only if more than one option are selected from a group of checkboxes? For example, in the below screenshot, we want the text box to appear if any of the checkboxes are selected, but if no checkbox is selected, the text field should be hidden.
You’ll notice that you can’t select the same text field again. That’s because a conditional field in Docusign can only be conditional based on one rule, not multiple.
So, how do we get around this? Using Formula Fields. Formula fields help you create more advanced logic when multiple conditions need to trigger the same condition. Here’s how to do it:
1. Add Checkboxes:
Include a checkbox for each option that should display the text field.
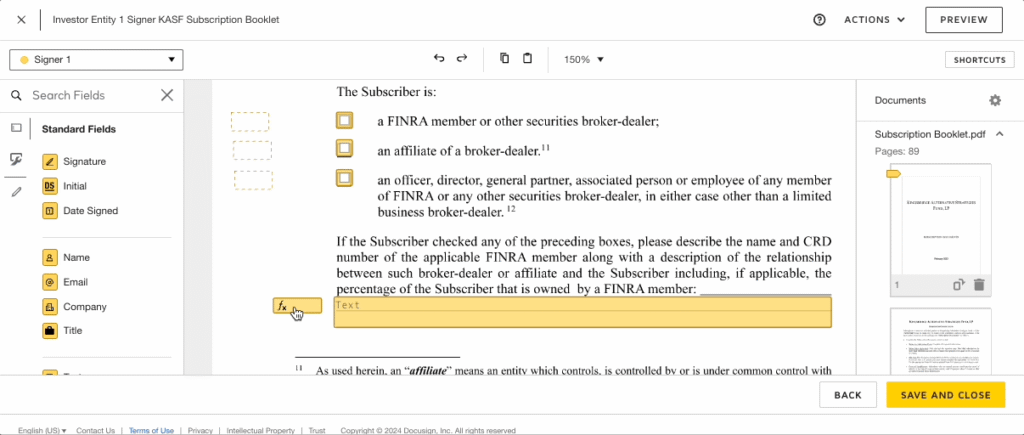
2. Add Hidden Text Fields
- Add a text field next to each of the three checkboxes.
- Click on the text field and on the right-hand sand corner, set to “read only”.
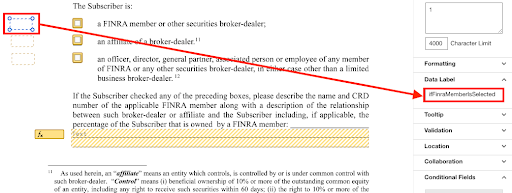
- Inside each text field, type the number 1.
- Head over to the data label and place a descriptive name for the text field for easy identification. After renaming, change the font color to white so that recipients won’t see them, but Docusign’s formula will.

3. Make Each Text Field Conditional
This step is crucial. To make each text field conditional to the check box they are related to. To do this click “Create Rule” and set it to “Checked”. Do the same for all text fields.
4. Use Formula Fields
Add a formula field to calculate the total sum of the hidden text fields. This formula should contain a statement. The statement can either be true or false. If the statement is true, the formula will return the value 1 and if the statement is false, the formula will return the value 0.
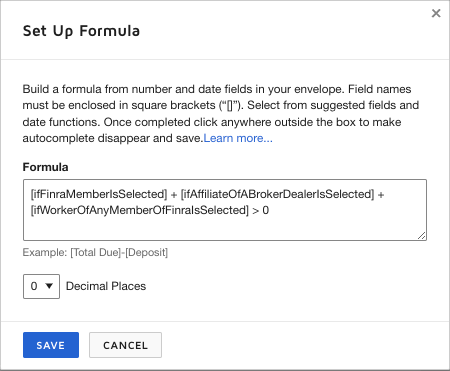
Under “edit formula”, go to set-up. The formula will look like this:
[trigger1] + [trigger2] + [trigger3] >0
This formula adds up the values of the three text fields. If any of the checkboxes are checked, the sum will be greater than zero. In the example below, our statement indicates that the total sum of all the hidden text fields is greater than 0.
This formula step is essential because if the value is greater than zero (meaning the signer checked at least one box), the field will show up automatically. But if the value is zero (no boxes were checked), the field will stay hidden.
Once you’ve set up the formula, go to “Conditional Fields” and create a rule. You’ll see an option that says “Click on the fields to show when trigger field = “. In the textbox next to it, type 1.
Best Practices for Using Docusign Conditional Logic
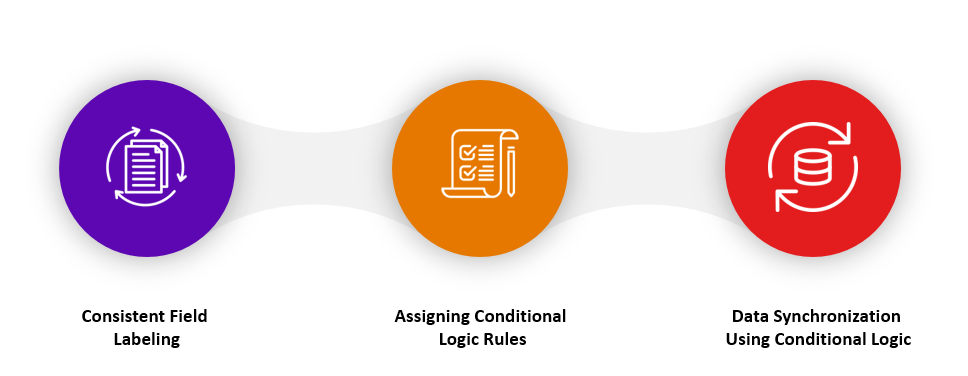
Consistent Field Labeling
Immediately renaming field labels upon adding them to your document is crucial. This practice simplifies data extraction and management.
Assign Conditional Logic Rules
Ensure that conditional logic rules are only applied to fields assigned to the same recipient. A conditional rule can only include fields assigned to the same recipient.
Practical Tips for Implementing Conditional Logic
Rename Field Labels
Renaming your field labels immediately after adding them to your document is essential. Without clear labels, managing and understanding your data becomes challenging. It’s much easier to work with well-labeled fields when setting up conditional logic rules and when you need to extract data later.
According to Data Camp, businesses with customer data that isn’t labeled or organized can have issues with grouping their customers correctly. Without clear categories, it’s tough to spot different types of customers and figure out what they like. This can lead to ineffective marketing efforts.
Assign Conditional Rules to the Same Recipient
When setting up conditional logic, ensure that all fields involved are assigned to the same recipient. Conditional logic cannot force one signer to complete fields based on another signer’s input. This means you need to carefully plan which signer will complete each part of your document and assign fields accordingly.
Use Conditional Logic for Data Automation
Conditional logic can also be used to automate data workflows. By ensuring that fields are dynamically displayed based on user input, you can streamline data entry and ensure that all necessary information is collected without redundant or irrelevant questions. And if you’re ready to level up, you might want to check out how to create mail merge Docusign templates.
Leverage Advanced Formula Fields
In more complex forms, you might need to use formula fields to handle multiple conditions. Formula fields allow you to perform calculations or logical operations based on the values of other fields. For example, you can set up a formula field to sum the values of several checkboxes and display a text field if any of the checkboxes are selected.
Test Your Conditional Logic
After setting up conditional logic, don’t forget to thoroughly test your document. Use the preview feature in Docusign to ensure that all conditional rules work as expected. This helps you identify any issues before sending the document to signers.
Set up Conditional Logic for Complex Forms
Sometimes, you’ll need to add conditional logic to more complicated forms with interdependent fields. It takes a bit of planning and testing to make sure everything’s set up right and the form works the way it should in different situations.
Frequently Asked Questions About Docusign Conditional Logic Fields
Can I apply conditional logic across multiple recipients in Docusign?
No, conditional logic can only be applied to fields assigned to the same recipient. This means that one signer’s answers cannot trigger fields for another signer. To use conditional logic effectively, make sure all related fields are assigned to the same person within the document.
How do I test if my conditional logic setup is working correctly?After setting up conditional fields, use the Preview feature in Docusign to test your logic. Go through the form as if you were the signer, selecting different options to ensure that fields appear or disappear as intended. This helps catch any errors before the document is sent out.
What is the difference between trigger fields and conditional fields in Docusign?
- Trigger Fields are the initial fields that determine whether other fields will appear or stay hidden. For example, a Yes/No question can act as a trigger.
- Conditional Fields are the fields that show or hide based on the response to the trigger field. For example, if “Yes” is selected in the trigger field, related conditional fields will appear for additional input.
Can I use complex conditions like multiple triggers or formulas in Docusign?Yes! Docusign allows you to create advanced conditional logic using formula fields. For example, you can display a text box if any of several checkboxes are selected by summing values from hidden text fields. This lets you handle more intricate scenarios, like multi-trigger conditions or calculations based on signer input.
Why is consistent field labeling important when using conditional logic in Docusign?
Consistent field labeling is crucial because it helps you easily identify trigger and conditional fields when setting up or modifying rules. Clear, descriptive labels reduce confusion, simplify data extraction, and make troubleshooting easier if the form doesn’t behave as expected. Without proper labels, managing complex forms with multiple conditions becomes challenging.
Conclusion
Docusign’s conditional logic is a valuable tool for making dynamic, error-free forms. By setting up trigger fields and conditional fields, you can easily define both simple and complex rules. This will make data collection more accurate, and the form-filling process a lot smoother.
Plus, if you keep your labels consistent and make good use of formula fields, you’ll really get the most out of this feature. So, give these tips a try and watch your Docusign workflows become way more efficient!
Take the next step in enhancing your document workflows. Contact us now to learn more or schedule a consultation to get started!
")